
Queens game strategy for your first move
Try this Queens game strategy when a region fits in one row or column. Its queen must use that line, so cross out squares from other regions there.
Find your first cross
Find both A squares. Tap the three squares you can cross out in row 1.Stay in row 1 and keep both A squares open. Try another square.Three crosses are in place. Tap the only square where B’s queen can go.Find the two B squares. One already has a cross. Try the other one.Correct. R2C1 is the only B square left, so it must hold the queen.The board shows the solution. Close the explanation to continue your attempt.
| 1 | 2 | 3 | 4 | 5 | |
|---|---|---|---|---|---|
| 1 | |||||
| 2 | |||||
| 3 | |||||
| 4 | |||||
| 5 |
Find both A squares on this board. Before placing a queen, which three squares in row 1 can you cross out?
Check the three crosses and the first queen
On the first tutorial board, both squares of region A lie in row 1. Whichever square holds its queen, row 1 belongs to A. Cross out the other three squares in that row.
The first row on board A reads B, C, C, A, A. Cross out R1C1, R1C2 and R1C3. Region B had only two squares, R1C1 and R2C1, so its queen must go in R2C1.
Queens game strategy by technique
Read the board without swapping row and column
R counts down from the top and C counts across from the left. On tutorial board A, R1C5 is the yellow A square in the top right. Reverse the two numbers and you get R5C1, a purple E square in the bottom left. To follow a deduction, find the row label, slide along that row to the column, and read the letter inside the square. The letters let you check which region owns a square even when two colors look similar.
A cross records something you have ruled out. A queen commits you to a square and blocks other squares immediately. If a deduction leaves two possible homes for the same queen, keep both empty. On board A you can already account for the queen in the first row while both yellow squares are open. The three crosses outside the yellow region are all the information you need for the next move.
Continue the row lock on board A
Once you have placed the B queen at R2C1, look at the opposite edge. Region E has just two squares, R5C1 and R5C2. The first shares column 1 with the B queen. Place the E queen in the second. A placement near the top of the board has settled a region at the bottom, so scanning only the eight neighboring squares would have missed it.
Now read column 3 from top to bottom. R1C3 carries an opening cross. R2C3 is in the occupied second row. R4C3 touches the E queen diagonally, and R5C3 shares its row. That accounts for four squares, and the column still needs a queen. Place it at R3C3. Notice that the proof came from the column even though region C still covered a large part of the board.
What if a region still has candidates in two rows?
Look only at region B on the untouched board A. Its two squares lie in rows 1 and 2, so B’s shape alone tells you nothing about which row its queen takes. You can rule out other regions in a row by this method only when all of B’s remaining candidates lie in that row.
Can you use this Queens game strategy in a column?
Run the check in both directions. If a region has two squares left in one column, leave both open and cross out that column’s squares in other regions. Then check the affected regions again. As soon as only one legal square remains in a region, you can place its queen.
Reserve column 5 on puzzle 09
Open puzzle 09 in the library and find region E in the bottom right. Its only squares are R4C5 and R5C5. Cover either one with your finger and imagine placing the E queen in the other. Both choices use column 5. Leave the two E squares open and cross out R1C5, R2C5 and R3C5. You can make all three marks before deciding which row gets the E queen.
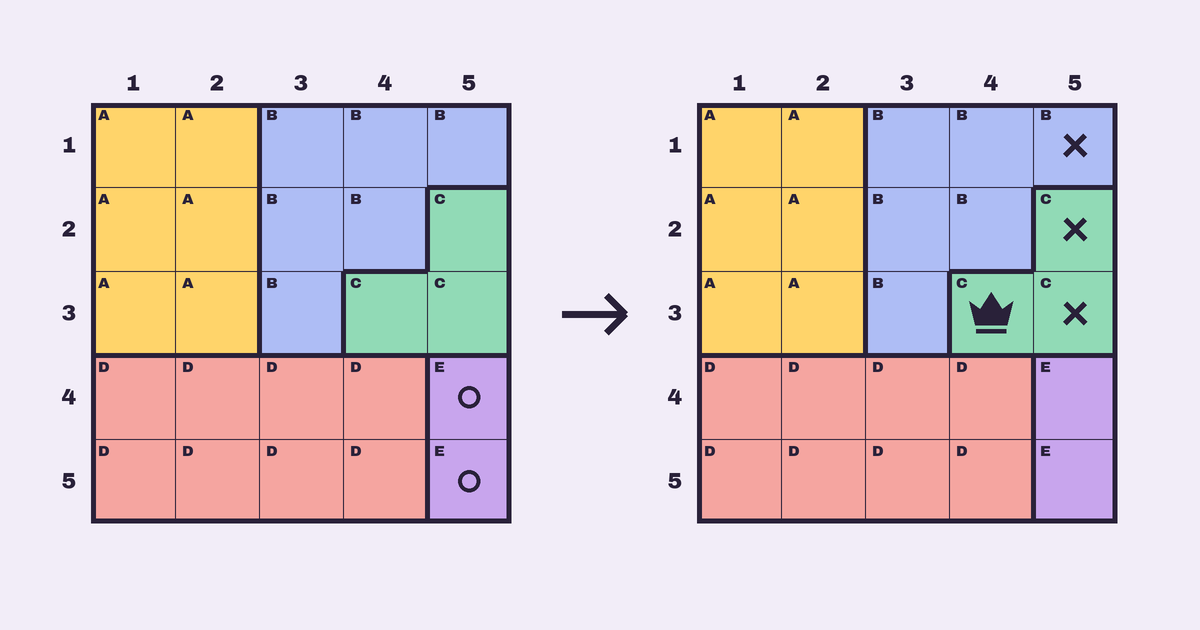
Which region lost the most options? Region C began with R2C5, R3C4 and R3C5. Two of those three now have crosses, so place its queen at R3C4. The new queen touches R4C5 at a corner. Look back at the two E squares you kept open. Only R5C5 survives. The column deduction has now given you the exact row that was missing at the start.
Practice row and column locksWhat if Queens leaves several singles at once?
Pause puzzle 09 just after placing the C queen at R3C4, with the E queen still off the board. Region B also has a forced move. In row 1, its square in column 4 shares the C queen’s column and the one in column 5 has an opening cross. In row 2, its squares in columns 3 and 4 touch the queen or share its column. The B square in row 3 shares its row. The only B square left is R1C3.
You can place the B queen before the E queen, or the E queen before the B queen. Each placement already follows from the C queen and the three crosses. If a hint points at a different region from the one you just checked, compare the two reasons. Both moves can be forced in the same position.
How far does a diagonal restriction reach?
On tutorial board C, compare R1C2 with R4C5. From the first to the second you move three rows down and three columns right. Two squares lie between them. The queens occupy different rows, columns and regions, so they can both stand there. In fact, both belong to this board’s completed position. Drawing a cross along the entire diagonal would discard one of them.
Now compare R1C2 with R2C3. The row and column each change by one. The two squares share a corner, and placing the first queen rules out the second square immediately. When two coordinates look diagonal, count the steps in each direction before marking them. Check the region letters as well. Even distant squares cannot both hold queens if they belong to the same region.
Recover an accidental cross and check the finish
Return to the opening of puzzle 09 with just the three column crosses. Suppose you accidentally cross out R3C4 as well. Every square in region C is now marked although C still needs a queen. Undo the stray tap to recover R3C4 and keep the three justified crosses. If you have made useful moves since that tap, select Erase and clear the manual cross itself. If the square still shows an automatic cross, check which queen blocks it before trying to erase it again.
To check a finished puzzle 09, read the queens from row 1 through row 5. Their columns should be 3, 1, 4, 2 and 5, and their region letters B, A, C, D and E. Each column and each letter occurs once. The column gaps between successive rows are 2, 3, 2 and 3, so no pair of queens in neighboring rows touches. These three scans check the placement even if you left some empty squares unmarked.
Rules
Place five queens, one in each row, column and lettered region. Two queens cannot occupy neighbouring squares, even diagonally.
Rows
Each row needs exactly one queen.
Columns
Each column needs exactly one queen.
Regions
Each lettered region needs exactly one queen.
No touching
Queens cannot touch at a corner. They can share a diagonal if they are farther apart.